Caitríona Redmond: Back-to-school bits - including these quick and easy veggie hand pies

Pic: iStock

Once I get the kids back to school full-time, there’s an inclination to take up a new pastime. I don’t know why I do it to myself when I only want to enjoy a cup of tea in peace.
Being able to close the door to the office and know that, for a short while at least, I will be able to work uninterrupted is priceless.

Ah, the false economy of buying flashy and pretty lunchboxes to satisfy the wants and needs of our kids.
If there's one thing I've learned when buying lunch boxes, it's that those zip-up chiller-style packaged bags are no good.
All it takes is for one yoghurt accident plus several crumbs to be fermented in the corner of the chiller zip-up bag, give it a couple of days, and it will have a smell.
What's worse, that detritus will have gathered in the seams, and it becomes more and more difficult to clean as time goes on.
Instead, I prefer to buy a lightweight plastic box that can be easily thrown into the top of the dishwasher or washed by hand.
And my criteria for a kids' lunch box might be different to yours, but this is what I look for when I'm buying a lunch box.
- The lunchbox must be airtight or watertight. If it is not being employed as a lunchbox, it will be in the freezer or fridge for food storage. Trust me yoghurt spillage is something you do not want to happen in the bottom of a school bag so a tight seal is essential.
- It must be easy to open and close; it's not just about taking care of small hands. Kids in a hurry to eat lunch or finish up after lunch will muddle closing the lunch box and it will become a source of frustration. If it's not easy to close, the contents may end up in the bottom of the school bag.
- Larger is better when it comes to lunch boxes. You might think that it's great to have the perfect sandwich-sized lunch box, but your child is going to want to eat multiple things during their lunch break. It's easier to add individually packaged items into a lunch box than it is to be fiddling with compartments. More compartments equal more cleaning.
Finally, I give this advice to parents every single year, particularly to parents of junior-infants children - school lunch boxes are not the place to be introducing new foods.
While eating together as a group at school is fantastic for encouraging your child to eat, if they don't eat it at home, it's highly unlikely they will eat it at school.
The school lunch is essentially fuel. For your child to be fueled for school, you will need to put food in the lunch box that they will eat.
Your child will eat five lunches a week. Out of an entire week of breakfasts, lunches, and dinners, five meals out of 21 are the only meals that you can't control.
Introduce new foods, flavours, and textures at home over several weeks before you include them in the lunch box.
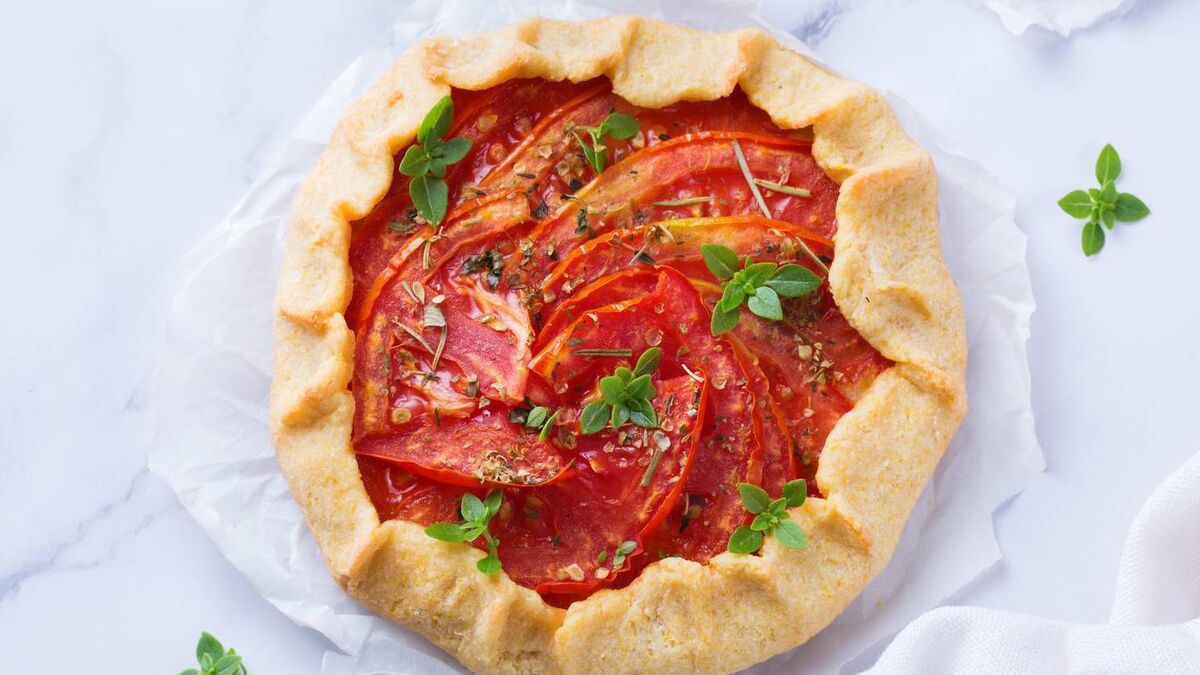
These little individual pies are more about assembling the best of seasonal ingredients and diving in. This month I have a glut of tomatoes so I am enjoying these every few days. Servings Cooking Time Total Time Course Ingredients 200g shortcrust pastry Plain flour (for dusting) 100g cream cheese 6 fresh medium tomatoes, sliced Fresh oregano and thyme 1 beaten egg Salt and pepper Method Preheat a fan oven to 180°C, line a baking tray or use a non-stick baking tray. Roll out the shortcrust pastry into a large rectangle. Divide the rectangle into quarters using a sharp knife. Spoon the cream cheese into the centre of the quarters, leaving a large frame on each quarter of pastry free. Place the sliced tomatoes on top of the cream cheese. Sprinkle with fresh oregano and thyme leaves (but keep a few aside for garnish and serving). Pull the sides of the quarters together towards the centre. You don’t want to cover the tomatoes, just nestle them inside a little blanket with the tomatoes peeking out. Paint the exposed edges of the pastry with the beaten egg then season everything liberally with salt and pepper. Bake in the oven for 25 minutes, allow to cool slightly before serving with a fresh green salad.Vegetarian Hand Pies
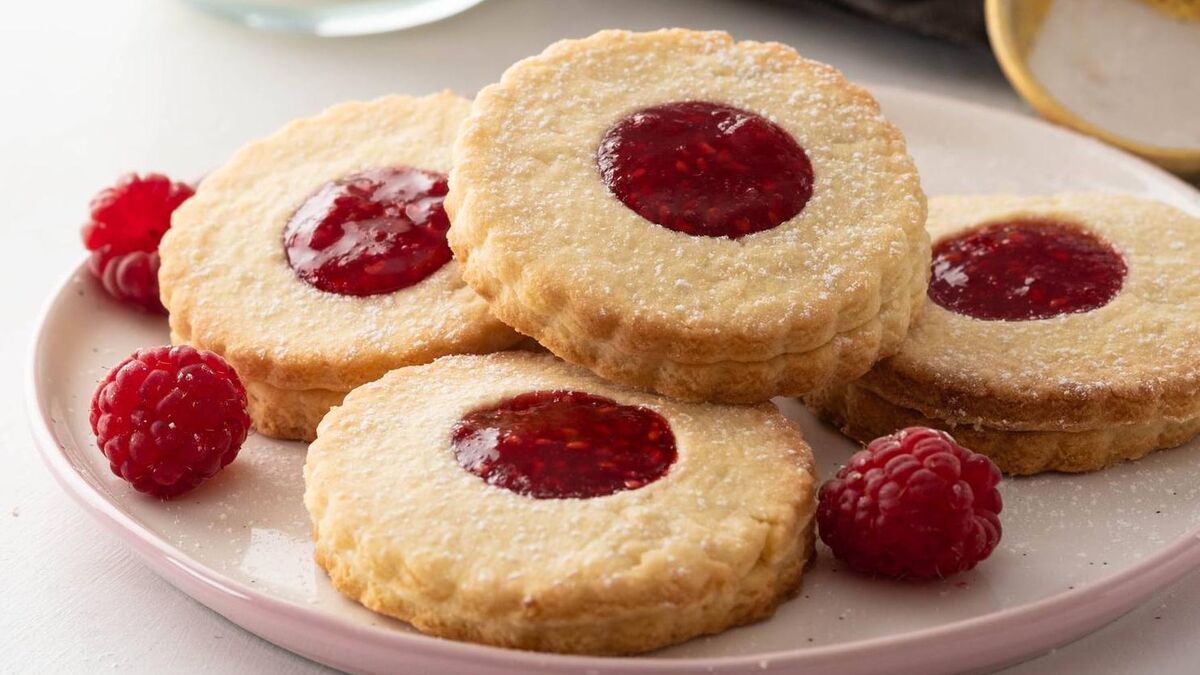
Make your own version of the perennial tea-dunking favourite! Preparation Time Cooking Time Total Time Course Cuisine Ingredients 300g plain flour 90g caster sugar 85g butter at room temperature 2 medium eggs 1 tsp baking powder 1 tsp vanilla extract (or the seeds from 1 vanilla pod) 1 jar raspberry jam Method Note, this recipe uses a stand mixer or electric beater. Place your mixing bowl onto the scales and weigh out the sugar and butter. Beat well until soft and fluffy. Add the eggs one by one and beat until they are well mixed into the batter. Add the vanilla extract or seeds from a pod. Pour the flour and baking powder slowly into the bowl and beat until mixed with the eggs, sugar and butter. Beat until everything becomes a tight dough ball. Cut a large piece of cling film and turn out the dough onto the cling film. Wrap well and place into the fridge for at least 1 hour before rolling and baking. At this point you can put the dough into the freezer to keep for up to a month. Just remember to take it out to defrost in the fridge until you are ready to cut it to size and bake. After at least an hour heat your fan oven to 180°C. Cut out more baking parchment to line the baking trays. Dust your work surface and rolling pin with flour. Roll the dough to approximately 0.5-1cm thick. Cut as you please with whatever shape cutters you like If you want to do an interior cut out, then cut out the main shape on the work surface. Transfer the dough to the baking tray, then cut the inside part out before baking. Place onto the lined baking tray and into the oven. The amount of time the cookies will take to cook depends on their size. A medium (palm of your hand) sized cookie takes approximately 10 mins. Adjust your cooking time up if they are bigger or thicker, down if they are thinner or smaller. Remove your cookies from the oven after they are cooked, leave to stand on the baking tray for 2 mins, then remove from the parchment and place them directly onto a wire rack to cool. Once cool, place a teaspoon of raspberry jam on top of one cookie, then top with a second. Eat on the same day as you add the jam as it will make the cookie soggy over time.Homemade Jammie Dodgers