Caitríona Redmond: My simple trick to know how long the freezer door was left open
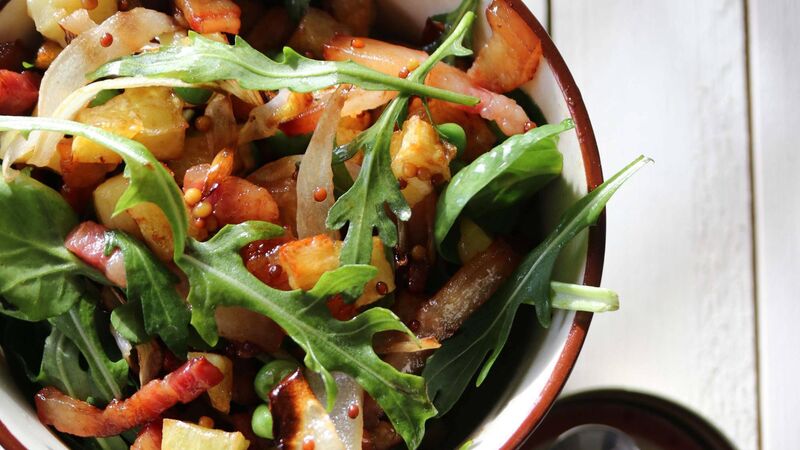
Hot Potato Salad - Caitríona Redmond's recipe features this week
I have a chilling tale to tell you.
Last week a certain someone accidentally left the freezer door open when they helped themselves to some ice cream.
On the one hand, I am delighted that they helped themselves to my stash of supermarket cones and freeze pops when they heard the ice cream van doing the rounds. They didn’t bother asking for cash for the van, just went straight for the back of the stand-up freezer. I keep a cache in there all year around. Having a box of these shop-bought treats saves me a tonne of money during the summer. Plus, the kids never feel hard done by because they can have ice cream, just not from the van unless it’s a very special occasion.
I’m not so happy about the door being left open. The freezer stands inside of a cupboard and the press door was closed but the freezer open inside. This sort of insulated the contents but it was over 24 hours before I realised the problem and at that point, the items inside had started to thaw.
The denser items like large cuts of meat were still very much frozen but I could tell how much of a temperature loss I’d had in the freezer from one simple trick. I’ve been doing this for years and it is just so handy because I use it all year around to keep an eye on the freezer.
I have a clear plastic cup that I fill halfway with water and freeze solid. Once the water is a solid block of ice, I put a coin sitting on top of the ice. The frozen cup of water sits inside the freezer, but if the temperature begins to rise I can spot it straight away. As the water begins to thaw, the coin slides down into the cup. If the freezer has warmed slightly the coin will be submerged a little, if the freezer has thawed a lot then the coin will be in the bottom of the cup. The great thing about this trick is that even if you don’t go near to the freezer at all you can still spot if you have had something go awry just by checking the cup.
The cup in my case was still half full, although the coin was firmly in the bottom. I had been storing some burgers and sausages in the freezer which were still cold so we had a barbecue with those. This leads me to believe that perhaps the certain someone had an ulterior motive. The remainder of the freezer contained berries leftover from last year's harvest and I salvaged what I could into a fruit compote.
I’ve taken this as my prompt to empty, clean, and thaw out the freezer. I don’t know whether I should be thanking or cursing the culprit. Either way, I know my cup and coin trick will save many a side of bacon for readers in the future!

Now that the weather is much warmer, I am more mindful of how often I open the fridge.
Even though it’s tempting to store milk on the door for easy access, this is the area that is most prone to temperature fluctuations. If you can’t control the temperature on the door of the fridge, you won’t be able to guarantee that you get the longest life out of your dairy products.
Generally, I keep condiments and open items that won’t go off quickly on the door, then make sure that the milk is on the top shelf, which is colder. All my dairy items hang out together in the top of the fridge; it’s the coolest area to chill, like a refrigerator VIP nightclub. Keeping the dairy products in the best spot guarantees their shelf life and reduces the risk of you having to throw out spoiled milk or similar.
The glass shelf just above the crisper drawers is the best spot to keep any meat. I recommend you put your meat onto a shelf or a tray to prevent seepage or spills spoiling the food in the drawers below.
During the Summer months the fridge is a powerhouse. You can keep it running at its optimum efficiency by:
- Keeping items away from the cold-conducting back wall.
- Making sure that the drain is clean.
- Not overloading the fridge space. Some condiments and pickles don’t need refrigerating I promise.
- Setting the chill to the middle number on the dial (it’s normally 3). The higher the number the harder the fridge will work. If you have a small kitchen this will make it warmer believe it or not.
- Cleaning/wiping down all the seals on the doors.
Warm Potato Salad
The beauty of this recipe is that by cutting the potatoes into small cubes, you can speed up the cooking time for the tasty bites.
Servings
4Preparation Time
15 minsCooking Time
30 minsTotal Time
45 minsCourse
MainIngredients
4 medium white potatoes, peeled and cubed
1 tbsp sunflower oil
6 streaky rashers, cut into small pieces
1 medium onion, peeled and sliced
1 cup of frozen peas
1 heaped teaspoon of wholegrain mustard
1 tsp of runny honey
2 tbsp of vinegar (I like cider or balsamic)
2 handfuls of baby spinach and/or rocket
Method
Preheat your (fan) oven to 180C.
Line a heavy baking tray with non-stick baking parchment. Pour the cubed potatoes and the sunflower oil on top of the parchment and mix together so that the cubes are coated in oil. Put the baking tray in the oven for 15 minutes.
After 15 minutes carefully lift out the baking tray and add the rasher pieces and sliced onions. Stir so that they are well combined with the cubed potatoes. Return the tray to the oven.
Meanwhile, boil a kettle and pour the boiling water on top of the cup of frozen peas (a quick defrost). Put the mustard, honey, and vinegar into a jar (which comes with a lid). Seal the jar and shake well to combine the dressing.
Once the baking tray has been in the oven for 30 minutes in total remove the tray and immediately pour the dressing over the tray and stir straight away.
Finally, drain the peas and add them to the baking tray. Serve while still warm.
While the leftovers (if you have any) are still warm, stir in the baby leaf spinach and rocket leaves. Decant into a lunchbox and take to work or school the following day!
Chewy Chocolate Cookies
The beauty of this recipe is that you can mix the dough, roll it, then freeze it and take it out when you're ready to bake just a few. This means you can have beautifully baked, crispy on the outside, chewy on the inside, cookies cooling on your rack wit
Servings
20Preparation Time
18 minsCooking Time
20 minsTotal Time
38 minsCourse
DessertIngredients
90g Malted Milk Extract
90g light/golden demerara sugar
90g caster sugar
150g butter at room temperature
2 medium eggs
300g plain flour
100g cocoa powder
1 tsp of baking powder
1 packet mixed chocolate chips
Method
Preheat your oven to 200C and line 2 baking trays with non-stick baking paper.
Cream the milk extract, sugar and butter together until light and fluffy. Beat in the 2 eggs until fully combined then add the flour, cocoa powder, and baking powder and mix again. Finally stir the chocolate chips into the cookie dough.
Using a dessert spoon, spoon the mixture directly onto the tray, leaving a lot of space between each cookie. I normally bake only 4 on each tray so you will need to rotate your trays, however it's rare you'd bake the whole batch all at once.
Bake in the oven for between 9-12 minutes. As soon as they start to turn dark brown & crackled on the outside, remove the trays and leave the cookies on the baking paper for 10 minutes before gently moving with a spatula to a cooling rack. The cookies will keep for up to 5 days in a sealed container kept in a cool, dry location but honestly I'd refrigerate or freeze your dough then bake these cookies fresh.
Once cool, I highly recommend sandwiching a scoop of vanilla ice cream in between two cookies and enjoying in the hot weather.