Currabinny Cooks: Our favourite recipes with mint and tips on how to grow it

Mint is extremely easy to grow. Picture: Bríd O'Donovan.

In spring and summer, when mint abounds in markets and backyard gardens alike, cooking with the herb is a pleasure. Its cooling, sweet flavour pairs wonderfully with both sweet and savoury dishes.
We always grow mint in pots at home. If let loose they can spread quite quickly, taking over your herb garden. Mint is perennial so it will come back year after year and will spread vigorously if left unchecked. It is always better to pick up cuttings of mint plants rather than growing from seed. Mint takes a long time to grow a decent-sized plant from seed. Plug plants are generally widely available and cheap. Buy from a garden centre or farmers market instead of a supermarket.
To propagate, simply cut short lengths of the root, lay them in a tray of compost, cover thinly, keep moist and wait for the new growth to appear. We grow a few types of mint in Currabinny but the main one is common garden mint (spearmint) which is perfect for most culinary purposes. More exotic varieties include chocolate mint (think After Eights), crisp Moroccan mint, grapefruit mint, and for something very strong, pennyroyal.
In from the garden, we always have a mint plant on the kitchen window-sill. If sneaky insects are making their way into your kitchen, then a container of fresh mint may be just what you need. The pungent nature of mint deters bugs from making your home their home. Pests such as ants, mosquitos, and mice will avoid mint plants whenever possible. If you are buying rather than growing mint, look for bright green leaves free of brown spots or blemishes.
Mint is often under-appreciated in its usefulness as a culinary herb. It has obvious appeal as a sweet herb for garnishing and flavouring desserts and drinks such as lemonade and mojitos.
There is, however, much more to mint when you start to explore its more savoury possibilities. An important thing to remember when using mint in any cooked dish is that excessive heat will deplete its flavour so it is always best added towards the end of cooking.
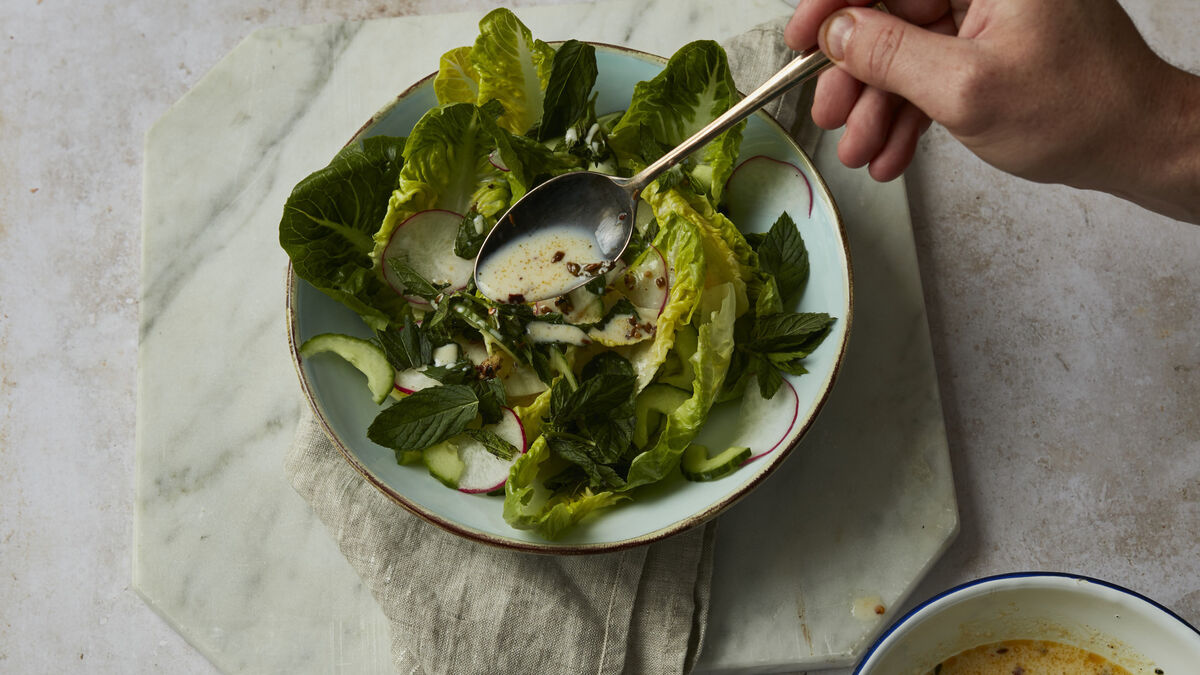
Gem Salad with mint and spiced buttermilk dressing
This particular recipe is a testament to how a bit of lettuce, mint, and a good dressing can be brought together to make a perfect little plate of deliciousness
Servings
4Preparation Time
10 minsTotal Time
10 minsCourse
StarterIngredients
4-5 radishes, sliced very thinly
3 heads of gem lettuce, torn or cut into good-sized strips
½ medium cucumber, halved, deseeded and cut into ½ inch slices
Handful of mint, leaves only, torn or bruised
Pinch of sea salt
For the dressing:
250ml buttermilk
2 tbsp rapeseed oil
1 tsp of chilli flakes
4 dried curry leaves
1 tsp of cumin seeds
1 tsp of mustard seeds
Sea salt
Method
To make the dressing, pour the buttermilk into a small mixing bowl. Heat the oil in a small pan until starting to sizzle. Add the chilli flakes, curry leaves, cumin seeds and mustard seeds to the hot oil. Cook on the pan until the spices are toasted: this should only take around 20 seconds. Pour the hot spicy oil into the buttermilk and whisk to combine. Taste and season with a little sea salt.
On a large serving platter, arrange the torn lettuce leaves, thinly-sliced radish, and cucumber, tossing a little to mix everything up. Season lightly with a pinch or two of sea salt. Scatter the mint leaves over the salad and lastly spoon the spiced buttermilk dressing over the lot.
Deliciously simple.
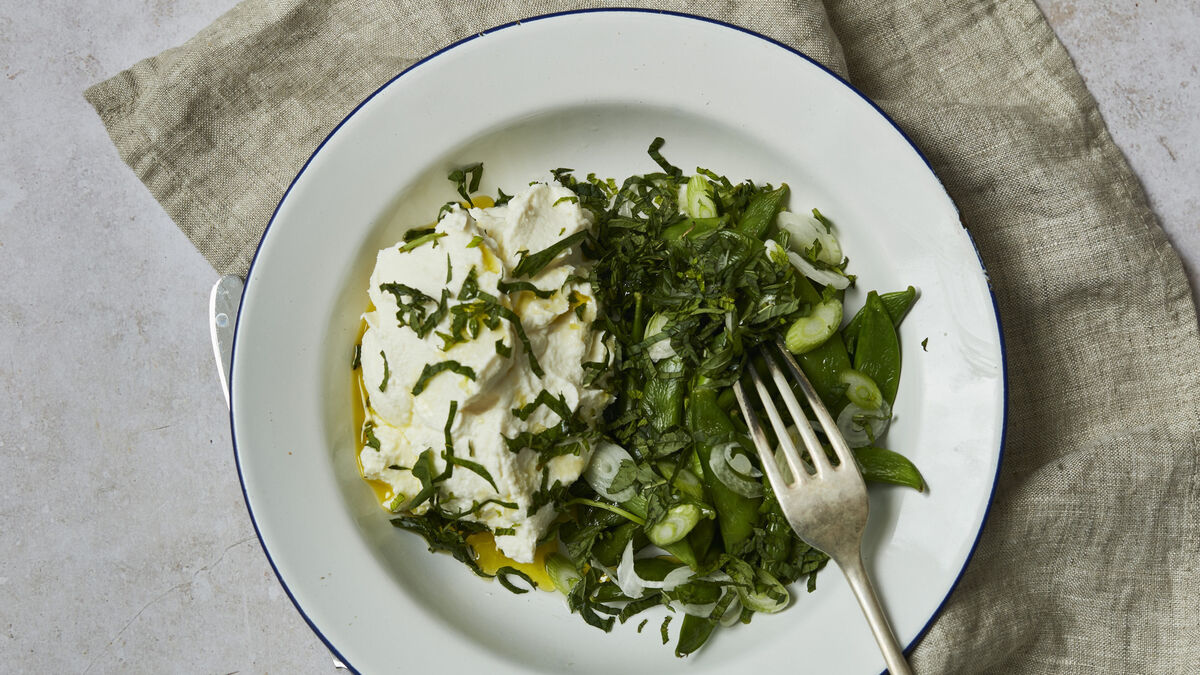
Sugarnaps with whipped ricotta and mint
This is a gorgeous little dish to have on a table for a summery lunch or picnic. It also works great as a refreshing, crunchy starter dish
Servings
4Preparation Time
10 minsTotal Time
10 minsCourse
StarterIngredients
400g sugarsnap peas, strings removed
250g good quality ricotta
Bunch of spring onions, greens removed, whites very thinly sliced
2 tablespoons of olive oil
Juice of ½ lemon
Bunch of mint leaves, torn or shredded
Sea salt and freshly-cracked black pepper
Method
Pulse the ricotta in a food processor with a small pinch of salt, until very smooth.
Add the sugarsnaps to a pot of salted boiling water for just 1 minute. Drain and refresh with cold water. Pat dry and toss together in a bowl with the spring onions, olive oil, and lemon juice, and a small pinch of sea salt.
Arrange on a serving plate or split between individual bowls with a good dollop of the whipped ricotta and a generous scattering of mint leaves.
Mint chocolate frozen yoghurt
Sometimes you want something cold, sweet and refreshing without the bother of making ice cream or sorbet. Frozen yoghurt couldn’t be simpler to make

Servings
6Preparation Time
4 hours 0 minsTotal Time
4 hours 0 minsCourse
DessertIngredients
250g granulated sugar
Handful of mint sprigs
250ml water
500ml Greek yoghurt
100g good quality dark chocolate
Method
Put the sugar and around half of your mint ( leaves and stalks) into a food processor and pulse until you get a sort of moist green sugary mush. Place this along with the 250ml of water in a small saucepan and bring to the boil.
When the sugar has all dissolved, remove it from the heat and cool the mixture as quickly as you can: we generally pour the minty sugar syrup into a cold bowl and place that in an ice-bath.
Finely chop the rest of the mint.
Place the yoghurt in another mixing bowl and add the chopped up mint. Stir in the cooled syrup and then pass it through a fine sieve. Place this smooth green yoghurt into a freezable container with a lid.
Freeze for at least 3 hours, until the ice crystals start to form. Take it out at this point and stir the ice crystals into the more liquidy centre so that the mixture becomes smooth again.
Place back in the freezer, repeating the stirring an hour later. Leave back in the freezer overnight.
When you are ready to serve, take it out of the freezer and serve with the chocolate grated or shaved over the top.


.png")

