Jennifer Sheahan: Create a mood board for your dream home
The Home of the Year winner shares the 'road maps' she and her interior designer Caroline Maguire used in her renovated cottage
Jennifer Sheahan: Create a mood board for your dream home

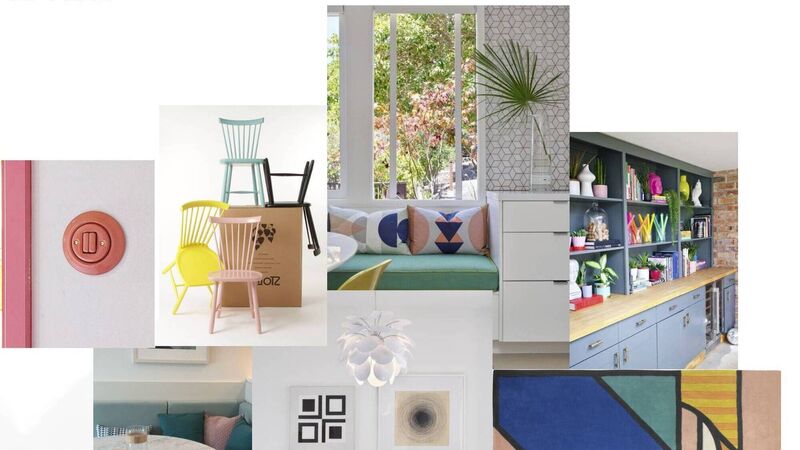
The mood board that designer Caroline Maguire created with Jennifer Sheahan for her kitchen/dining area.

Before going through the steps of how to make a mood board, you must first understand why you should do it at all. A mood board is a collection of images (or words) where you can visualise your desired design.

When you’re planning on updating a room or building a new house, a mood board is key to achieving flow and cohesion, and will serve as a roadmap that keeps you focused on the design that you want to achieve.

Jennifer Sheahan's kitchen/dining area. Picture: Moya Nolan

Looking at dozens (OK, hundreds) of Instagram posts and design magazines is fun, but it eventually gets overwhelming. You need somewhere you can keep the things you like most, and see what works best together to create your dream design.

When creating your mood board, it will be your playground where you can combine colours, textures, and patterns to get them just right before making any purchases. It will allow you to build a complete picture to create flow throughout your home. When it’s finished, your mood board will be your guide which will lead you to achieving a design that matches your vision.

Creating a mood board that does all that takes a little work — there’s more to it than simply collecting pictures of things you like —but it’s worth it. Here’s how to create one that works for you.

WHAT SHOULD I USE?

There are a hundred different tools you can use to create your mood board, but there is no need for anything complicated or even to spend any money. To keep things simple, here are the best tools that are free and easy to use.

The first and easiest is simply paper — you can use a large sheet of cardboard or even just a notebook. Browse magazines or print off pictures that you like and stick them inside, rearranging them as you go. 

For the digitally savvy among us, my favourite free tools in order of personal preference are Pinterest, Canva, Miro, and some version of either PowerPoint, Google Slides, or Keynote. Pick one you like, and create a section for each room you plan to design.

DEFINE YOUR VISION

Before you even go looking at pictures for inspiration, first close your eyes and imagine yourself in your new space. The most important thing to focus on is how you want it to make you feel. 

Do you want a cosy, mood-lit living room to relax in? A bright airy kitchen to energise you in the mornings? A tranquil office space where you can concentrate? 

Define the emotions first, and keep those feelings with you to help you choose the right images. This is how you begin your mood board.

GATHER INSPIRATION

Next, start browsing the internet or magazines for inspirational images. Start by searching for the room you’re planning for plus the emotion you want it to evoke. Save those that best evoke the emotions you want to feel.

The mood board that Caroline Maguire and Jennifer created for Jennifer's hallway.

If you’re using Pinterest, it will get really good at suggesting new images based on the ones you have saved already. You don’t have to limit yourself to interior design accounts or magazines — you can save any colours, textures, patterns, or materials that inspire you. 

I encourage you to visit lots of places and take photos — galleries, cafes, friends’ houses, and even nature. Gather as many images as you like until you feel you are just collecting more of the same.

PICK A FOCAL POINT

Once you have gathered a bunch of images you like, pick one (per room) that truly encapsulates the mood you want to achieve in that room. It could be a piece of furniture or a swatch of fabric, or something as abstract as a sculpture or a vase of flowers. 

Inside the hall door of Jennifer Sheahan's home. Picture: Moya Nolan

It doesn’t mean you have to put this item in your room, but it will help you to focus and begin to narrow down your many options. Choosing one focal point will ensure all other elements work together in harmony.

COLOUR PALETTE

Once you have selected your focal points, it should help you decide the primary colours you want in each room. You can then use a colour wheel or paint swatches to choose complementary colours. 

There are some great free online tools that will help you generate palettes — check out Adobe (color.adobe.com), Coolors (coolors.co), and Canva (canva.com/colors/color-palette-generator/).

LAYER TEXTURES

Choosing the right combination of textures is key to achieving a sophisticated and polished design. Again, your focal point should help here. 

The mood board that Caroline Maguire created with Jennifer for her upstairs bathroom.

Decide the dominant texture in each room, such as hardwood flooring, a giant plush couch, or a rattan rug. I love contrasting textures to create depth and luxury — for instance, soft velvet against rough wool, or sheepskin throws on polished concrete floors. 

Mix and match with images or samples of textures to discover your own preference.

TWEAKS

The last step is to arrange the final images you’ve chosen in an arrangement that will work in your home. Resize images to get the right scale and proportion. You won’t have an exact replica but try to get as close as possible to understand how items will work together in real life. 

Jennifer Sheahan's upstairs bathroom. Picture: Moya Nolan

Decide whether the image is complete or whether you need to bring in additional elements for balance. Crucially, consider what you can remove. 

Someone (potentially Coco Chanel) once said “Before you leave the house, look in the mirror and remove one accessory.” Sometimes your design may feel unfinished because it’s overdone.

Q&A

I am renovating my bathroom but as it is tiled completely I don’t want to go to the hassle of removing the tiles. They are cream with a hint of peach so my choices of floor and vanity are limited. I would like to go with a timber floor and I am wondering if I could put a floor-standing timber vanity on it.

There is no need to let your current tile colour dictate your flooring and vanity choices — you can easily paint over your existing tiles, which would allow you to choose your own colour without removing them. That said, most timber shades would work well with cream and peach. You can certainly choose a timber vanity with your timber flooring, just ensure both are treated for bathroom use and that there is plenty of ventilation.

x

More in this section

Revoiced

Newsletter

Sign up to the best reads of the week from irishexaminer.com selected just for you.

Cookie Policy Privacy Policy Brand Safety FAQ Help Contact Us Terms and Conditions

© Examiner Echo Group Limited