Get Baked: Childhood cakes, when only something sweet will do

Some of Rich Myers' Get Baked treats
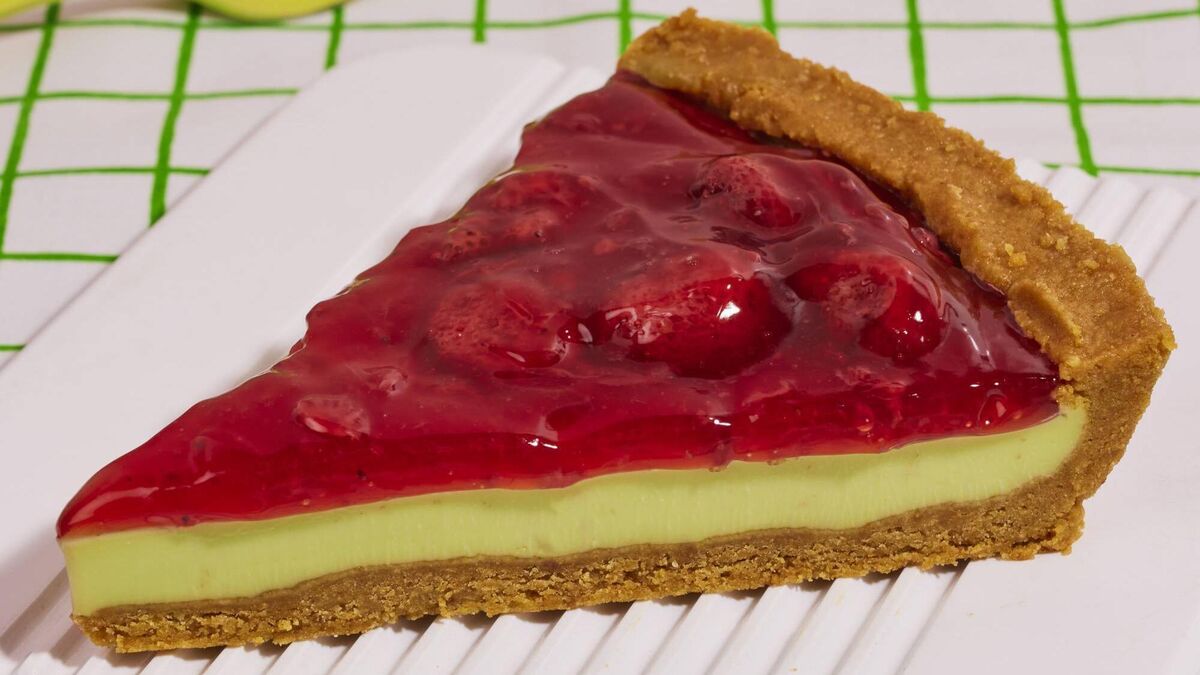
Rich Myers' Strawberry Limeade Pie
This thing tastes exactly the same as a Twister ice lolly, which everyone knows is one of the greatest things that exists.
Servings
12Preparation Time
8 hours 0 minsTotal Time
8 hours 0 minsCourse
DessertIngredients
For the ginger biscuit crust:
700g (1lb 9oz) ginger biscuits
400g (14oz) unsalted butter, cubed
5g (⅛oz) sea salt
For the lime posset:
800g (1lb 12oz) double (heavy) cream
200g (7oz) caster (superfine) sugar
80g (2¾ oz) light brown sugar
grated zest and juice of 5 limes
For the strawberry jam:
600g (1lb 5oz) fresh strawberries
350g (12oz) granulated sugar
juice of 1 lemon
1 tbsp liquid pectin (available from your favourite online retailer)
Method
To make the ginger biscuit crust, turn your ginger biscuits into a fine crumb using a food processor or blender (or a bag and a rolling pin).
Once your biscuits are pulverised, add them to a mixing bowl.
Microwave the butter in a microwave-safe container until fully melted.
Add it to the bowl of biscuit crumbs and mix together thoroughly using your hands, making sure that there are no dry patches. If the mix feels a little dry, melt another 50g (1¾ oz) of butter and add a tablespoon at a time until you reach the desired consistency. You’re looking for wet sand. Press the ginger biscuit crust into a 30cm (12in) pie tin, lining the base and the sides.
For the lime posset. It’s super simple, and hardly anything can go wrong, so relax and enjoy the ride. Heat the cream in a heavybottomed saucepan over a medium heat, stirring continually so that it doesn’t catch and burn at the bottom. After a few minutes, or when the cream is starting to get warm enough to take an extremely relaxing bath in, add the sugars, lime juice and zest to the pan and continue to stir.
Bring the cream to a simmer, but don’t let it boil. Continue stirring and let it do its thing for a few minutes, adjusting the heat accordingly so that it doesn’t get too hot, then take it off the heat. You want to make sure that the sugar has completely dissolved, which it should have done, but you can check by rubbing a small amount of the mixture between your fingers. Be careful, obviously. I don’t need another lawsuit on my hands.
Fill the crust with your posset mixture and leave to cool at room temperature.
Once cool, bang it in the fridge for at least 6 hours or until it’s set.
Ideally, overnight is best.
For the strawberry jam, all you’ve got to do is put all of the ingredients into a heavy-bottomed saucepan and place it over a medium heat.
Give them a stir and bring to the boil. As soon as the pan looks like a bubbling strawberry-laden party of chaos, turn the heat down to low and simmer for 45 minutes, stirring occasionally with a heatproof spatula.
Take off the heat and decant into a heatproof container to cool. Once cool, spoon the jam on top of the set lime posset layer, being careful not to pile it all into the middle. Use a small offset palette knife or the back of a spoon to evenly spread the jam all over the pie, making sure not to cover the edges of the crust. Place the finished pie in the fridge for a few hours so that the jam can fully cool and settle on top of the posset. Eat within 3 days, or keep in the freezer for up to a month.
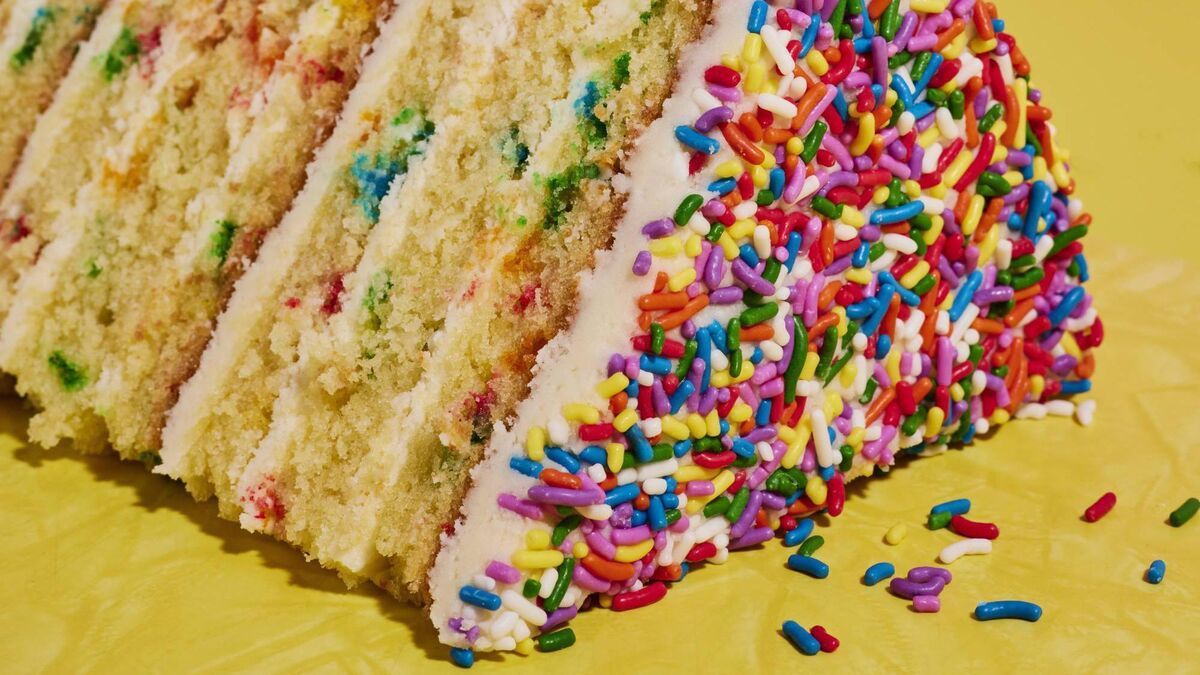
Rich Myers' Expensive Birthday Cake
I hate to sound like I’m coercing you into buying my sprinkles, but they really are the only way to achieve the desired aesthetic here.
Servings
12Preparation Time
3 hours 55 minsCooking Time
60 minsTotal Time
4 hours 55 minsCourse
DessertIngredients
For the funfetti sponge:
1.25kg (2lb 12oz) margarine (this is the only recipe where I advocate using it)
1.25kg (2lb 12oz) caster (superfine) sugar
1.25kg (2lb 12oz) eggs (approx. 25 eggs)
10g (¼ oz) vanilla extract
1.25kg (2lb 12oz) self-raising flour, sifted
10g (¼ oz) sea salt 100g (3½ oz) expen$ive sprinkles
For the vanilla buttercream:
1kg (2lb 4oz) softened unsalted butter
1.75kg (3lb 13oz) icing (powdered) sugar, sifted
50g (1¾ oz) custard powder
50g (1¾ oz) whole milk
10g (¼ oz) vanilla extract
To finish:
500g (1lb 2oz) expen$ive sprinkles
Method
Preheat your oven to 160°C (320°F/gas 3).
To make the sponge, cream the margarine and caster sugar in the bowl of a stand mixer (using the paddle attachment) until light and fluffy. This will take at least five minutes on a high speed. Add the eggs five at a time (if you add them all at once, the mixture will split).
Once the mixture looks smooth, add five more eggs, then repeat the process until you’ve added all of the eggs. Add the vanilla extract with the last five. When you’re out of eggs, scrape down the bowl and continue to mix for another minute. Then scrape down the bowl again – I know this seems like overkill but it’s worth it – continue to beat for another minute and then add the flour in three stages, beating between each addition so that it’s totally incorporated. When you’ve added all of the flour, add the salt and the sprinkles and give a final mix using a spatula or wooden spoon.
Line the base and sides of three 23cm (9in) round baking tins (71/2cm/3in deep), then split the mixture evenly between them.
Give the tins a firm bang on the workbench to knock out any large air bubbles, they’ll ruin your life later on when you’re trying to slice the sponges, so this is very important. Bake for an hour or until they’re golden brown on top and a skewer comes out totally clean.
When baked, leave to cool at room temperature inside the tins.
After about half an hour, remove the cake from the tins and continue to cool at room temperature.
When they’re totally cool, they’re ready to slice. You’re going to be slicing each sponge into four thin layers, so you’ll end up with a total of twelve. Slice the domed tops off and cling film (plastic wrap) to use later.
Who wants to waste cake? I don’t, that’s for sure.
When you’ve got twelve thin layers of sponge stacked on top of each other with a layer of greaseproof paper between them, wrap the stack in clingfilm and refrigerate. You want the sponge to be cold and firm when you’re assembling the cake.
Whilst the sponges are firming up you can make your buttercream.
In the bowl of a stand mixer, use the beater attachment to cream the butter on high speed for at least five minutes, or until the butter is very pale. It should go from being yellow to almost white. Add the icing (powdered) sugar in stages and beat on high speed for at least a minute between each sugar addition. Add the custard powder, vanilla extract and milk in with the last load of sugar and continue to beat for at least another 10 minutes. This seems like a long time, but it’s essential if you want to achieve a really smooth buttercream.
By now, your sponges should be nice and firm and you’re ready to assemble your cake. When the buttercream is ready, place a 28cm (11in) cake drum on top of your cake turntable (with a damp J-cloth underneath to stop it sliding) and place the first layer of sponge into the middle of the drum. It’s very likely that you’ll have some layers that are thicker than others, and I’d recommend using the thicker ones at the bottom of the cake. Think of them like foundations for building your house.
I would recommend using a palette knife to apply the buttercream.
Shmear a thick layer of buttercream on top of your first layer of sponge, then repeat the process until you’ve reached the top. Stop every couple of layers to make sure that your cake is straight – you can do this by eye, or by using a spirit level. I’d recommend using a spirit level, it might seem a bit over the top but the last thing you want is a 12-layer cake that looks like it is on the verge of collapse.
Once assembled, it’s time to apply the crumb coat.
This is a very thin layer of buttercream that goes all over your cake to lock in the crumbs and stop them from going into your buttercream when you coat the outside of the cake. If you don’t apply one, it’s not the end of the world, but you might find bits of sponge make their way into your buttercream. This can spoil the appearance and, more importantly, the texture. It doesn’t need to look neat, it just needs to be smooth. When applied, place the cake into the fridge again to set.
Once set, you can apply the rest of the buttercream all over your cake. Use your palette knife to shmear the buttercream around the cake, removing the excess in the process. Obviously, you can reuse the excess because there will be no crumbs in it. Thank you crumb coat, our lord and saviour.
Repeat the process until your cake is covered and there are no uneven, buttercream-lacking crevices. When your cake is covered, immediately coat the whole thing in expen$ive sprinkles.
It’s important that you apply the sprinkles before the buttercream has set too firmly, or the sprinkles won’t stick properly. There’s not really a way of doing this that won’t result in sprinkles going all over the worktop, so just make sure it’s clean so any stragglers can be collected and reapplied to the cake. When the cake is sufficiently covered, you’re done.
I’d recommend putting it in the fridge for at least 30 minutes before slicing, just to ensure that the buttercream has set. In the unlikely event that you’ve got leftover cake, it’ll keep perfectly fine in a sealed container for 3 days, or in the freezer for up to a month.
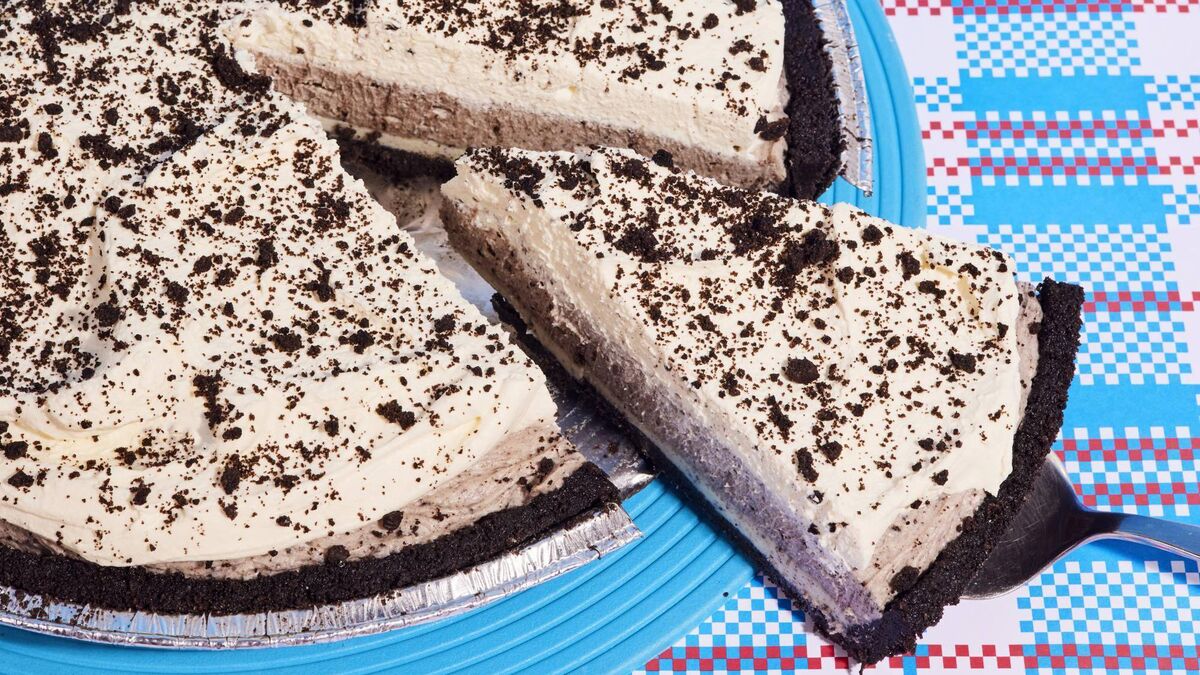
Milk and Cookies Cheesecake
There is no point whatsoever trying to make it yourself. The ones that you can buy are everything you’d hope they’d be: overly sweet, unhealthy and delicious.
Servings
12Preparation Time
3 hours 35 minsTotal Time
3 hours 35 minsCourse
DessertIngredients
For the Oreo cookie crust:
1.2kg (2lb 12oz) Oreo cookies
350g (12oz) unsalted butter, cubed
400g (14oz) cookies & cream spread
For the Oreo cheesecake:
670g (1lb 8oz) full-fat cream cheese, at room temperature
135g (4¾ oz) double (heavy) cream
120g (4¼ oz) icing (powdered) sugar
170g (5¾ oz) white chocolate, chopped up if in bar form
105g (3½ oz/1 pack) Oreo cookies
400g (14oz) Whipped Cream
20g (¾ oz) Oreo cookies, blitzed to a crumb
Method
Start by making the Oreo cookie crust. Blitz the Oreo cookies in a food processor or with a rolling pin to a fine crumb, then decant into a mixing bowl. Melt your butter in the microwave in a microwave-safe container until it’s totally melted (about 1 minute 30 seconds). Add the melted butter to your bowl of crumbs and mix thoroughly. Line your 30cm (12in) pie tin with the mixture straight away, then bang it in the fridge to firm up. Ten minutes later it’s ready to fill.
Melt the cookies & cream spread in the jar or tub in the microwave – ensuring you remove any foil – and pour directly into your Oreo cookie crust. Spread evenly with a palette knife or the back of a spoon. Bang it in the fridge to chill while you move onto the next stage of the pie.
In the mixing bowl of a stand mixer fitted with the whisk attachment, mix the cream cheese and double (heavy) cream together, beating on medium speed for exactly 2 minutes, then turn the mixer speed to the lowest setting and slowly add the icing (powdered) sugar.
Don’t add it all at once because it’ll go everywhere and gets in your nose, which is unpleasant in every way imaginable. When you’ve added all of the sugar, keep the speed on the lowest setting and continue to beat while you melt your white chocolate. Microwave it in short bursts, stirring in between. When melted fully, pour into your cheesecake mixture and continue to beat. Turn the speed back up to medium for a few seconds and then scrape down the base and sides, focusing on the base – it’s likely that there will be some cheese down there that hasn’t mixed in properly. Add the pack of crushed Oreo cookies and give it another 30 seconds on the highest speed.
Spoon the cheesecake mixture into your chilled pie crust and spread it out evenly. Bang it back in the fridge to set for at least 3 hours. It needs to set fully to be experienced at its best, otherwise it can be a bit sloppy.
After it’s set, finish the pie by topping it with Whipped Cream.
Adorn your creation with the small amount of crushed Oreo cookies that you have left.
Serve from the fridge (it’s a cheesecake you loser) and enjoy within 3 days. I wouldn’t freeze it. You could but just don’t.
- GET BAKED: Sensational cakes, bakes & desserts by Rich Myers is out now
- Images © Ellis Parrinder