A festive guide to DIY Christmas decorations
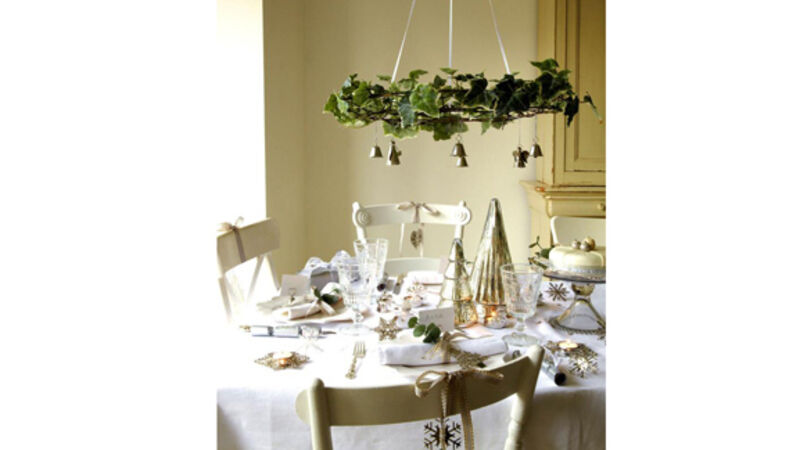
Kya deLongchamps gets all creative using leaves, jam jars, old lampshades and other recyclable materials to add cheap and classic novelty to your festive home.

A festive guide to DIY Christmas decorations

Christmas is universally celebrated as a time of coming together as a family, and this year I have a challenge for you. With the exception of your Christmas lights (LEDs please, you know it makes sense), and perhaps two decorations in multiples for the tree, let’s make just about everything yuletide and ornamental from found, natural, crafted and even waste materials.

If you have children, there’s plenty of rain soaked afternoons to teach a little self reliance and build excitement as you decorate the house. Here we’ll go over a few of my favourite, laughingly easy projects, but log on to Pininterest to find thousands more suited to your taste and skill level, gathered from crafters worldwide.

1 Cranberry jars

Dig out some jam-jars/coffee jars, clear is best and get the labels off with a soapy wash, finishing with an application of nail varnish remover to remove the glue. Pick some robust evergreen leaves from the garden and fill the jar loosely about 3cm from the top —don’t mash.

Top the greens only with water. Take a pinch of fresh cranberries and place a layer on the greenery. Put a tealight on the top and continue to frame with cranberries to the top edge of the jar. Use as real flames for the table, replacing the light as needed.

2 Ivy and spruce festive chandelier

Keep those cuttings from the Christmas tree, and hunt for some variegated ivy in the garden or woods. Keep the ivy in long lengths using a florist’s wire frame for a wreath. Wind your ivy around, poking it into the twists and turns to hide the frame. Insert sprigs of pine cuttings along the length of the wire and add a few faux berries if you want a dart of colour.

Tie ribbon in red or faded pink to three points and suspend from a hook or beam over the table. If you fancy some flash attach some old chandelier pieces or glass or plastic drops from thread at different heights to sway over the table and catch the candlelight. Be wary of suspending candles over a table from all but a dedicated, strong setting.

3 Sheet music stars

If you don’t have some old piano music around, yellowing book pages works just as well. Take about three pages and fold them short edge to short edge into a fan. Using glue or slivers of clear tape to join the short ends into a long accordion strip.

Open the shape out into a circle and glue a star or circle cut from an old Christmas card in the centre. Use thread or ribbon to hang. As you become more adept with paper, you can make fan stars that join neatly at the centre. Try cutting sheet music into rose shaped ‘petals’ and curl around each other to assemble blossoms. Set on a wire or pipe cleaner stem. There are dozens of book page ornaments to explore online.

4 Medieval pomanders

Pomanders make lovely ornaments, can add to a centrepiece on the table or be gifted to scent drawers. Take extra time to add intricacy to this Christmas classic.

Taking a ripe but not over-ripe orange with a fat skin, mark a geometric pattern with a black marker. A small paring tool (not for kids), can be used to make white patterns to follow with inclusions of clove, or leave as is). Following the pattern push whole cloves into the orange to make lines and bands. Thicker bands of 1-2cm looks more dramatic, but it can be hard on the fingers.

Spice up the orange still more by rolling it in a mixture of ground cinnamon, allspice, and nutmeg over a week before crafting. Suspend from ribbon girdled over the orange. As it dries it will smell delicious.

5 Felt ornaments

Felted wool can be stitched up with rustic imprecision by little fingers with adult help to make ornaments as gifts, tree trimmers or additions to a garland. Use squared paper to make a simple pattern of a star, moon, or teddy around 5cm across.

Use tailor’s chalk or marker to trace pattern onto the felt, keeping them close to save material. Cut out two shapes and place together right side out. Secure at the centre with a safety pin.

Use running stitch in a brightly contrasting thread to sew up, starting between the layers to hide your knot. When you reach the final 2-3cm (point of the start of teddy’s leg) stuff generously with cotton wool or lint from the dryer, prying into limbs and points with the end of a knitting needle and close.

Use a beading needle to add beads, or sew on some buttons for eyes, trim etc. Suspend from a simple hook of ribbon or wind up a point or paw with heavy thread and make a loop.

6 Lampshade table tree

This is my favourite idea for the season of all — and the idea of author and designer Sarah Moore (Vintage Home: Stylish ideas and over 50 projects from furniture to decorating Kyle Books. €15).

Collect up some old fluted lampshades meant for pendants from charity shops or your clutter stash and strip them down to the frame. You’re looking for around four - eight frames that will stack larger to smaller in a stable ‘tree’. If the frames are not brightly coloured enough for you, wind the wiring up in ribbon or lengths of old material cut into strips, making each frame unique.

Assemble the tree, and then using everything from old clip-one earrings to beads and buttons, fashion minute decorations, tying on with thread, wool, whatever is to hand. Add some battery operated LED fairy lights if you fancy (around €5 a set — try Tiger Stores). Done!

Tree wishes for Christmas

PRE-TRIM JOBS

* Allow at least 15cm for your stand or bucket and enough room for your tree topper without snapping the poor fairy’s neck against the rafters. Measure the tree and add about 50cm for a rough total height in situ. Tailoring to size will just give nature a poke in the eye

* Whether you choose fir, spruce or pine, any dead tree will struggle to remain attractive beyond 15 days indoors. Bring it in at the last available moment. Site is away from radiators, open fires and other sources of direct heat.

* There are limited choices for a gigantic waving green beast — the hall, a public rather than intimate location, the corner of a family room, a bay or other recess, or in the case of a small tree, a very stable, table-top.

* A corridor or hall with any traffic whatsoever will require a generous passage, but is generally cool, ideal for preserving a real tree. Bay windows make a theatrical proscenium, teasing the neighbours. If the lighting is any distance from a power-point, tape the lead to the floor.

* Lopping even a few inches off the leader (top branch) will change the tree’s natural symmetry. It’s equally important to get the girth of the tree right when you purchase to avoid unsightly pruning.

* Cut an inch off its base and leave the tree standing in a bucket of water. A live tree without a pot provided can be put in builder’s sand or peat when it comes indoors and planted according to the supplier’s instructions once the season is over. A cut tree should be put in damp sand in a sturdy container wedged into position with stones or at a push, newspaper.

* Placing the tree against a wall, rotate it to find it’s best ‘face’ leaving the slightly flattened side from transport to the rear. Remove any rear tips that may mark matt paintwork.

More in this section

Cookie Policy Privacy Policy Brand Safety FAQ Help Contact Us Terms and Conditions

© Examiner Echo Group Limited