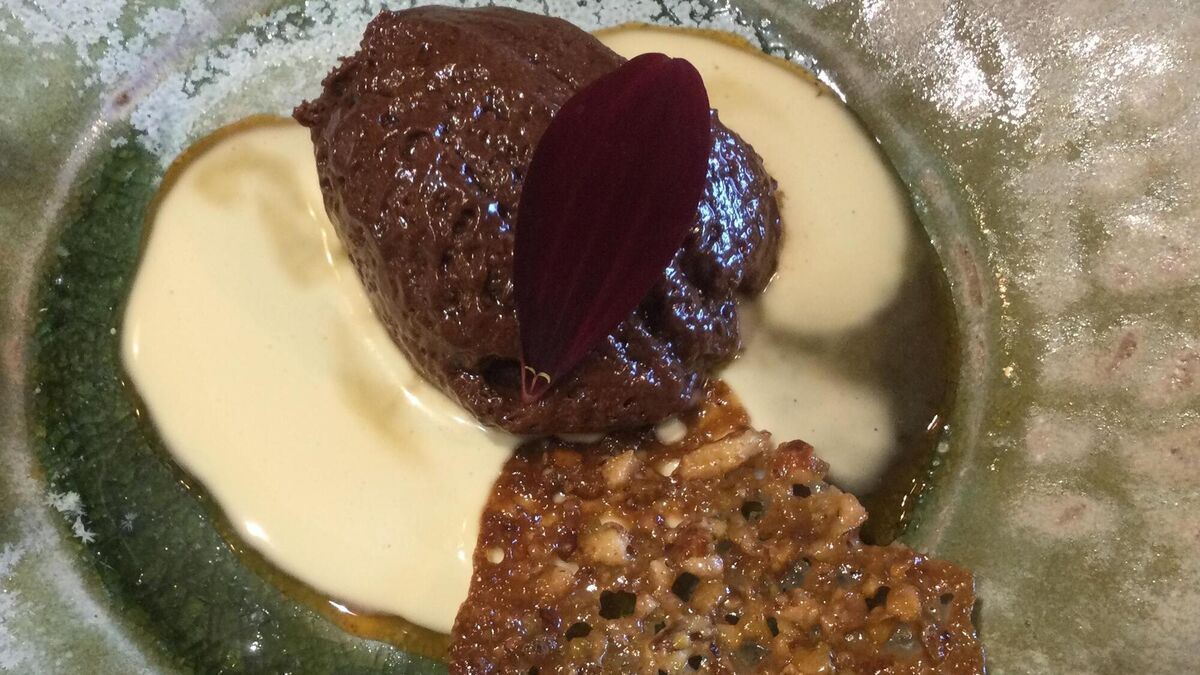
Rory’s Chocolate & Caramel Mousse with Nougatine wafers
62% or 70% chocolate is called for here to give the depth of chocolaty flavour that will counteract the sugar in the caramel.
SERVES
6
PEOPLE
Ingredients
For the chocolate mousse:
225g chocolate chopped into 1cm pieces
50g butter, diced
4 eggs
1 tsp vanilla extract
For the caramel
225g granulated or caster sugar
225ml water
For the Nougatine Wafers:
175g nuts, a mixture, or the entire quantity of a single nut such as pistachios, almonds, walnuts, pecan nuts and Brazil nuts. Hazelnuts may also be used but should be roasted and peeled before chopping
150g caster or granulated sugar
¾ tsp apple pectin (available in health food shops)
125g butter
50g glucose syrup
2 tsp water
Method
For the mousse and caramel:
Place the chocolate and butter in a Pyrex bowl. Place the bowl over a saucepan of cold water, making sure the water is not touching the bottom of the bowl and place the pan on the heat. Bring the water to a simmer and immediately turn off the heat, allowing the butter and chocolate to melt gently in the bowl.
Separate the eggs, putting the whites into a spotlessly clean bowl for whisking later. Whisk the yolks to a pale mousse.
To make the caramel, put the sugar and 125ml of water into a heavy-based saucepan and place on a low heat. Stir occasionally to encourage the sugar to dissolve before the liquid comes to a boil. Once it boils and has become a syrup, remove the spoon and do not stir again. Allow the syrup to become a dark chestnut coloured caramel. If it is colouring unevenly in the saucepan, tilt the pan gently to and fro to get it to even out by running the dark caramel into the paler syrup. Do not be tempted to stir as if you put a cold spoon into the caramel, it will “block” and go solid- a disaster. Keep going until the caramel is a deep chestnut colour and almost burnt. Then immediately and quickly add the remaining 100ml of water, hot, if possible, to prevent less spluttering.
(For safety, I usually place the saucepan sitting in the dry sink before adding that 100ml of water as it is in a deeper place and the spluttering caramel just splashes onto the sides of the sink rather than the worktop.)
Now the caramel will look a bit odd, but once you put the saucepan back on the heat it will cook out to a single consistency again. Cook it until it thickens again – when you dip a spoon into the caramel and allow it to drop off, it will fall in a thickish thread. Pour this gradually onto the whisked egg yolks, whisking all of the time. A food mixer with
a whisk attachment or a hand-held electric whisk will do this job perfectly. The mixture will whisk to a mousse in a matter of minutes. Stir the melted chocolate and the vanilla extract into the mousse. You may need to be a little vigorous with the stirring.
Whisk the egg whites to a stiff peak. Do not allow them to over-whip and become grainy. Stir a quarter of the egg white into the mousse to soften it and then fold in the remaining three quarters lightly yet thoroughly.
Pour the mixture into a shallow serving dish. There will not be a lot of mousse, but it is rich so the servings should be small. Place the mousse in the fridge to chill for 4 hours.
Garnish the chocolate mousse with a nougatine wafer and thick pouring cream.
Note: Perfectly ripe raspberries, particularly the autumn varieties, are delicious served with this mousse.
For the wafers:
Preheat the oven to 190°C/Gas Mark 5.
Chop the nuts in a food processor using the pulse button to render them to a semi-coarse texture. It is important you do not render the nuts to a powder and equally if the texture is too coarse, the mixture does not knit together so well. So, think grit rather than gravel.
In a small saucepan, combine the remaining ingredients, and cook on a very low heat just until the mixture is melted and smooth.
Add the nuts and stir to mix.
Using a silicone baking mat or an oven tray lined with parchment paper, drop on scant teaspoons of the mixture allowing plenty of room for the mixture to spread as it cooks. A standard oven tray, approximately 40cm x 35cm, will accommodate about 4 biscuits this size. You can of course make smaller biscuits by reducing the amount of mixture.
Cook for about 10 minutes or until the biscuits have spread into lacy and lightly caramelised flat crisps. They will be the colour of toasted hazelnuts.
The cooked biscuits will be soft and molten when removed from the oven so allow the biscuits to cool until set on the cooking tray before removing to a wire rack to cool completely.
Any remaining uncooked mixture will store perfectly in the fridge for up to one month. It will solidify but you simply prise off bits and cook as above.